
Every musician has had to deal with feedback at one point or another. This is particularly true for the less experienced, who often have to play in small, cramped rooms, which is a recipe for a feedback disaster. Thankfully, eliminating that ear-screeching feedback is not an impossible task, even though it might seem daunting at first.
Here’s how to stop mic feedback in a small room:
- Check the volume.
- Watch where you place the mic.
- Get a microphone isolation shield.
- Inspect the acoustics of the room.
- Pinpoint the problematic frequencies.
- Get a feedback eliminator.
- Use floor monitors.
- Do not cup the mic.
- Use a high-pass filter.
In today’s article, we’ll take a more in-depth look at some of the most common causes of microphone feedback and what you can do to eliminate them as easily and quickly as possible.
Soon, you’ll be able to get through your rehearsals without having to hear that awful microphone feedback from your sound system that every musician dreads.
Table of Contents
- 1. Check the Volume
- 2. Watch Where You Place the Mic
- 3. Get a Microphone Isolation Shield
- 4. Inspect the Acoustics of the Room
- 5. Pinpoint the Problematic Feedback Frequencies
- 6. Get a Feedback Eliminator
- 7. Use Floor Monitors to Avoid Microphone Feedback
- 8. Do Not Cup the Mic
- 9. Use a High-Pass Filter
- Key Takeaways – Feedback from your Sound System
1. Check the Volume
You can often cause microphone feedback by increasing your microphone’s gain and volume way more than necessary. Even if you’re not particularly loud, the volume might still be too high for the room you’re in and your setup.
Often, reducing your volume and the vocal mics gain will do the trick and eliminate the microphone feedback, or at least limit it to a bearable degree.
The only problem with this solution is that if you lower the vocalist’s volume, the rest of the band has to turn it down too. Otherwise, you would completely drown out the vocals and get a pretty bad mix.
If you like to play loudly, this might cause some dissatisfaction, but being quieter is better than going deaf due to the microphone feedback.
Besides, there is no real point in having extremely loud rehearsals. In fact, I’d argue that it is much more effective to have a relatively quiet rehearsal so that you can hear what other people are playing and tweak your sound where necessary.
Whichever way you slice it, lowering the volume will be beneficial. Even if there is no microphone feedback, you still might benefit from not going too loud.
2. Watch Where You Place the Mic
Another extremely common culprit for microphone feedback is improper microphone placement.
The most important thing to remember when it comes to this issue is that your mic should never face the speakers. This is a guaranteed way to blow everybody’s ears off.
Cardioid Microphone
One way to control this is with a cardioid microphone which allows you to adjust the direction of the microphone’s sensitivity, similar to directional microphones.
You can adjust the cardioid polar pattern. This means that you can point the cardioid microphone in the same direction as the sound source while keeping the speaker in its “null” position. This will help to reduce the amount of microphone feedback that you’re getting.
It’s also important not to move around too much so the microphone doesn’t get into a bad position which can cause microphone feedback.
I know this must be hard for particularly lively vocalists, but remember that you’re only practicing, and you’ll have plenty of opportunities to showcase your amazing dance moves when you go on stage. Focus on the music for now.
If finances are not a problem, using in-ear monitors might also be advisable.
These devices are typically used in concerts to allow musicians to hear their band well while eliminating microphone feedback, noise, and various distractions. There is nothing to prevent you from using them during rehearsals too.
Of course, in-ear monitors are not particularly cheap, so there’s no need to jump at them as soon as you start practicing with your new band.
It is best to invest in your instruments and amps first and then look into higher-end equipment like in-ear monitors, even if there is some microphone feedback.
3. Get a Microphone Isolation Shield
Microphone isolation shields are primarily used for recording, both in the studio and at home, but there is nothing stopping you from using them during rehearsals.
When recording a vocal track, you want to prevent your microphone from picking up random sounds from the room, and that’s essentially what you need to do to prevent interference and microphone feedback. Therefore, it makes sense to use an isolation shield during rehearsals.
While it will surely not isolate your mic completely from the noises your bandmates make, it will eliminate the most distracting sounds, which might lessen the microphone feedback.
Apart from that, you’ll be able to hear the vocals much more clearly. One of the most common problems in small rehearsal rooms is that the vocal mic picks up everything else from the environment, and the sound you get from the speakers is just a jumbled, incoherent mess.
Feel free to try this trick, as it is fairly inexpensive and won’t compromise your audio quality in any way. Even if it is not successful in eliminating microphone feedback, it will improve your overall sound quality at least somewhat and make you sound more professional.
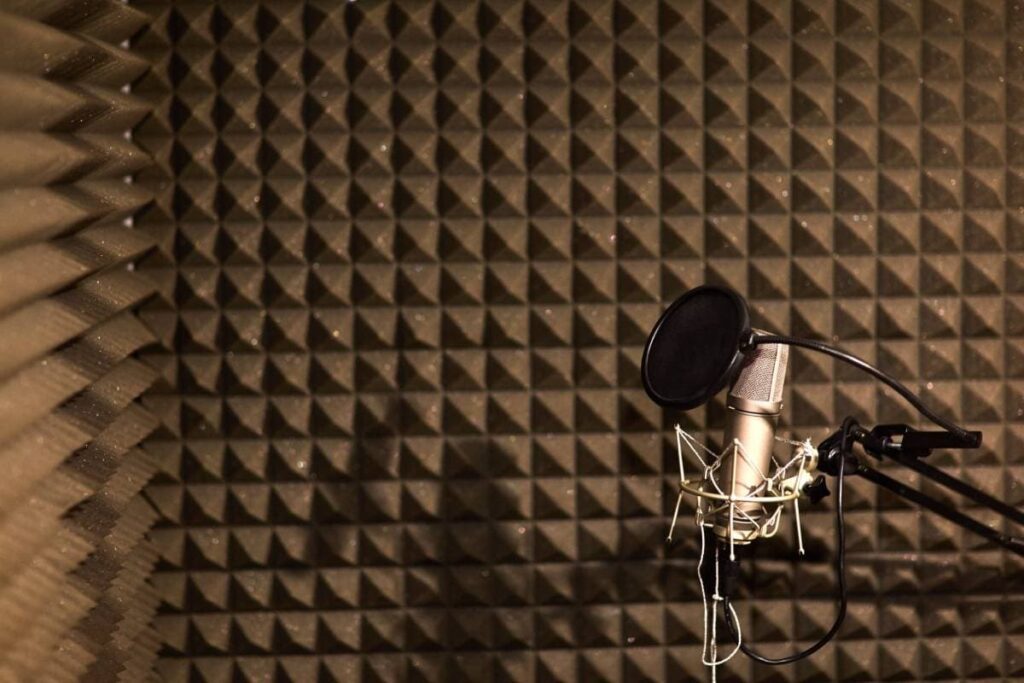
4. Inspect the Acoustics of the Room
A common issue in amateur rehearsal rooms is the acoustic treatment, or better said, the lack of it.
Apart from generally reducing your sound quality, this can also lead to problems with mic feedback, so it’s important that you check if the acoustics of your room are right.
If there is nothing to dampen the sound waves, they will easily bounce back from the walls to your mic and create a nasty mic feedback loop. It’s important to have at least something in the room to absorb the sound waves and prevent them from bouncing around.
If you’re working in a bare room with no carpet and no decorations on the walls, you’re going to have to deal with pretty bad acoustics.
At the very least, you should have a thick carpet and some drapes or blankets on the walls. Some DIY bands even resort to putting up carpets on the walls to help with the acoustics. Even padded furniture might help.
If you’re willing to invest more in your rehearsal space, you can buy some isolation panels or mats and put them in the right places on the walls. You should aim for areas that might cause the sound waves to bounce back the most, for example, corners.
Giving your room the proper sound treatment will definitely improve the sound of your music, help you hear your bandmates better, and help you eliminate an audio feedback loop.
It might not get rid of it completely, but it will surely allow you to achieve a better-sounding result. It will also reduce or eliminate the sounds coming from outside the room, allowing you to focus much more on your music.
5. Pinpoint the Problematic Feedback Frequencies
For a more technical approach, you can try to find the frequencies that are causing the squealing and howling, and zap them.
You’ll need a graphic EQ for this, although you might be lucky enough to have a mixer with a built-in graphic EQ.
If you have a graphic EQ, connect it to your mic and mixer, and make some noise to see what frequencies cause the trouble with the mic feedback.
This will allow you to remove those frequencies and, hopefully, reduce feedback along with them. If your mixer has a graphic EQ, the process will be even easier since you won’t have to connect an additional device.
You can also use a parametric EQ if you don’t have access to a graphic one.
This allows the sound engineer to boost the frequencies until the offending one is found so they can zap it. It’s also a very convenient method of removing problematic frequencies in general, regardless of whether they’re causing feedback or not.
If no equalizer is available, then you’ll have to make do with less sophisticated methods. However, don’t worry, as most musicians fall back on these methods and manage to eliminate feedback issues in your sound system in no time.
6. Get a Feedback Eliminator
Feedback eliminators are still not that common, but they are excellent additions to any setup, especially if you’re getting serious with your music.
Feedback eliminators usually don’t come very cheap, especially since you might need more than one, but they’re a worthy asset that can help you have more pleasant rehearsals and gigs.
The role of feedback eliminators is to monitor the feedback frequency that is coming in and adjust the volume to control feedback. Some frequencies cause feedback more often than others, so an eliminator will lower the volume when it notices a frequency that is likely to cause feedback.
Not all instruments work in the same way, and therefore, they don’t produce feedback in the same way either.
Microphones don’t pose the same problems as instruments, which is why it’s best to use a specialized eliminator for the instrument that is causing the issue.
If you’re certain that it is the microphone that’s causing it (and it often is), then you can just get a feedback eliminator for microphones, and rest assured that it won’t be causing problems anymore.
In short, a feedback eliminator can be an excellent addition to your gear. As they’re not particularly cheap, you should be extra careful when budgeting the new purchase, but overall, it will definitely be worth it.
7. Use Floor Monitors to Avoid Microphone Feedback
You’ll probably have floor monitors on stage when playing live unless you’re playing at a budget venue.
There’s no reason why your rehearsal space shouldn’t benefit from the same treatment (regardless of whether you’re dealing with feedback or not), as the setup will allow you to get used to what you’ll hear during a gig and learn how to position your bandmates relative to the monitors.
A stage monitor can be helpful because the mic is more likely to pick up live sound waves that come from an elevated source.
These live sound waves can reach the mic much more easily and are likely to cause problems. With a stage monitor, you’ll be able to hear yourself pretty well, but with fewer chances of feedback.
Alternatively, you’ll want to place your speakers on the floor and position them to face up. This will allow you to mimic floor monitors, but will probably not do the job as well as the real deal. Despite that, this solution will probably reduce or even eliminate feedback, which is the most important thing here.
8. Do Not Cup the Mic
Let’s be real; cupping the mic is probably the worst “technique” you can use.
You might think it makes you sound more badass, but it does nothing except distort your voice and make you sound much worse. It is a technique you shouldn’t use regardless of the situation.
You’re supposed to hold the mic below the grille; anything else would just be too counterproductive.
You want your mic to be directional. With directional mics, sound can enter it from the rear part of the element, which cannot happen if you cover that part of the microphone. When you cup the mic, you essentially negate all that effort and make your mic do the opposite of what it’s supposed to do.
When you cup your microphone, it becomes an omnidirectional microphone.
A device being omnidirectional means that there is equal sensitivity all around the element. This feature makes the mic more prone to feedback, apart from making you sound terrible. To kill two birds with one stone, simply stop cupping your mic. The sound technician (and your audience) will thank you.
9. Use a High-Pass Filter
A high pass filter for your microphone is a filter that only allows frequencies above a certain threshold to pass, eliminating everything below.
In some cases, high-pass filters can be a great tool for eliminating feedback, as it is essentially another way to deal with equalization.
If your microphone is too close to a bass-heavy area, or is not intended to capture a bass-heavy source, then using a high-pass filter will drastically reduce the chances of feedback. Apart from that, it will generally help you get a cleaner and better-sounding mix.
Key Takeaways – Feedback from your Sound System
Getting rid of microphone feedback can seem like a daunting task, but luckily, it can be done without investing too much effort.
More often than not, you can resort to a few simple fixes to eliminate it. There are a couple of things to keep in mind if you hear feedback sounds:
- Make sure your mic is positioned properly, not facing the speakers.
- Don’t turn up the volume too loud.
- Try to isolate your microphone from the sounds of other instruments.
- Give the room the proper sound treatment.
- Try to remove the offending frequencies.
- Invest in gear that can help you resolve this problem.

- Review of the ALABS IRON MINI-WL: A Powerhouse Wireless Microphone - October 4, 2023
- What is a Saturator in Music Production: A Brief Explanation - May 11, 2023
- What Are Rotary DJ Mixers? An Overview - May 11, 2023
SoundStudiomagic.com is a participant in the Amazon Services LLC Associates Program, an affiliate advertising program designed to provide a means for sites to earn advertising fees by advertising and linking to Amazon.com. We also participate in other affiliate programs which compensate us for referring traffic.