
I spent quite a bit of time researching how big a vocal booth should be, and after combing the entire internet, I’ve come up with the answer!
It’s not related to a specific dimension, but rather a total area.
The correct size of a vocal booth is about 16 square feet, and should be just big enough for you, a microphone, your computer, and a stand for your copy, and should not contain parallel walls.
Table of Contents
- Standing Waves
- Non-parallel Vocal Booth Designs
- Other considerations
- Sound Proofing
- Door placement
- Window placement
- Lighting
- Electrical
- Ventilation
- Faster Options
Yes. I said no parallel walls. If you have the luxury (and space) to build your custom vocal booth, your best bet is to make it with no parallel walls. This will help reduce “standing waves,” as audio technicians call them.
Standing Waves
Standing waves are a phenomenon that happens when sound continually bounces off of two parallel walls. The sound goes back and forth repeatedly and causes reverb along with a distinct ringing sound at certain frequencies. The frequency of the ringing depends on the distance between the two walls.
| Distance from wall to wall | Resonance | What it affects |
|---|---|---|
| 8 feet | 141 Hz | guitar, drums |
| 7 feet | 161 Hz | guitar, drums |
| 6 feet | 188 Hz | guitar, drums |
| 5 feet | 226 Hz | guitar, drums, voice |
| 4 feet | 283 Hz | guitar, voice |
| 3 feet | 377 Hz | guitar, voice |
Standing waves are generally a bad thing, especially when you’re trying to get a clean, crisp voice recording.
But none of that will matter when you consider a design that completely avoids the problem.
Non-parallel Vocal Booth Designs
To avoid standing waves, the best thing to do is to avoid parallel walls. This is relatively easy to do when your building your DIY vocal booth. Below are two designs that avoid parallel wall surfaces and would work nicely in the corner of any basement.
Diamond shape – (non-parallel walls)
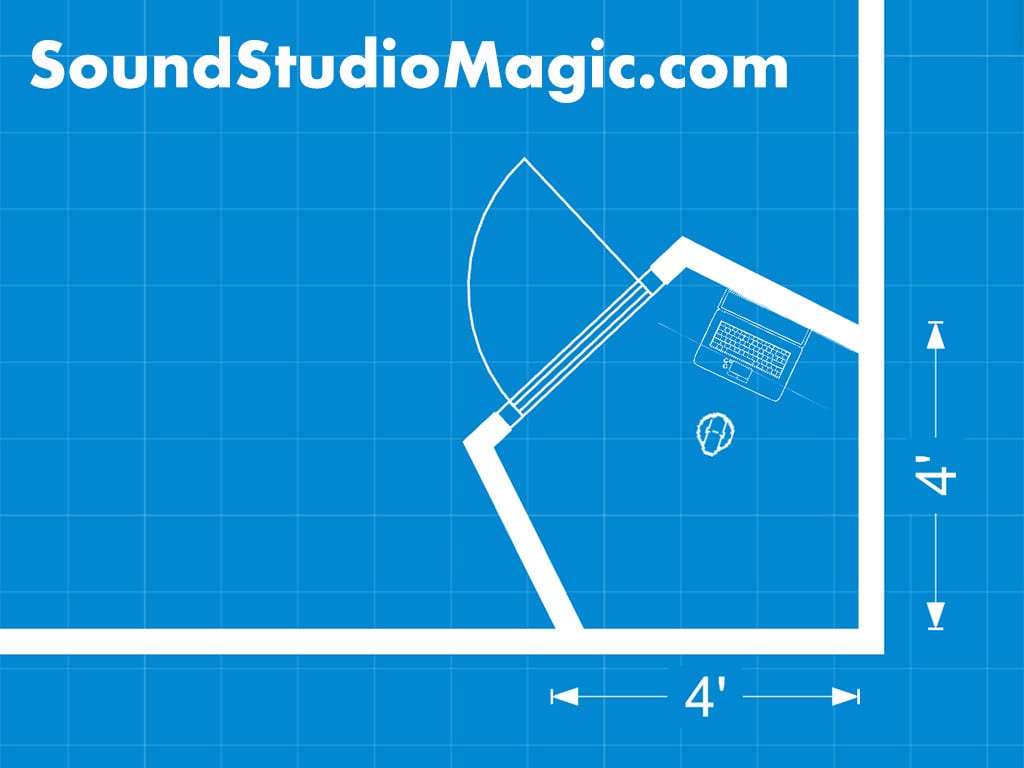
One design choice you can use to eliminate standing waves is the 5-sided, pentagon-shaped vocal boot. This booth design should yield roughly 16 square feet of space, which is the perfect size for a vocal booth.
This design requires a little more time and skill to execute if you’re building it yourself.
However, if you want to throw some money at the problem, you can buy this type of booth from VocalBooth.com, which has a collection of options in their “Diamond Series.”
Triangle shape
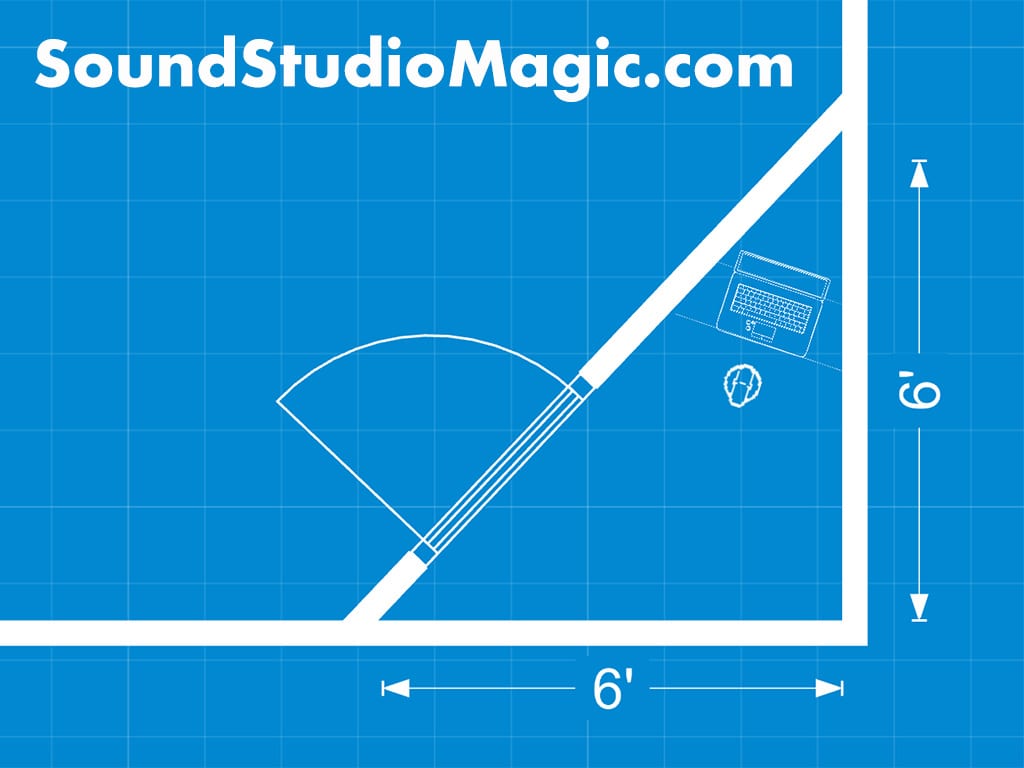
Another much more straightforward design choice would be to go with a simple triangle. You just have to build one corner wall at a 45-degree angle and install a door.
If you measure out 6′ from the corner on both sides, this one-wall design should also net you 16 square feet of vocal booth space, which is the perfect amount for one voice actor and a microphone. If you’re doing female voice work, check out this article on the best mics for female voices.
Other considerations
Once you have determined the size of the room and wall construction, you should consider some of the issues that you will face as you develop the design.
Sound Proofing
To treat the inside of your vocal booth, make sure to select an absorptive material that actually works in the vocal range. Most poorly designed vocal booths use materials that do not absorb the important lower mid-range where all the voice energy resides.
Choosing the correct absorptive material
Another confounding factor is the use of poor quality, low-density acoustic materials. Low density 1″ and 2″ thick foam boards are usually ineffective in the voice range. When used inside a vocal booth, they remove the highest frequencies but don’t touch the lower mid-range (voice range).
Mix that with the issues caused by poor room geometry, and the result is, you guessed it… terrible!
You’ll want to use 4″ thick Owens Corning 703 Fiberglass Board. If you can only find the 2″ thick variety, double them up. To make it look nice, you can wrap them in some fabric before mounting them on the walls.
Considering the frequency response of a normal voice, I found that most of the energy is in the range of 205Hz and 1450Hz. See my chart above on wall-to-wall dimensions and the resonant frequencies produced. You will understand how the ‘chest thump’ phenomenon in most vocal booths happens.
“make sure to select an absorptive material that actually works in the vocal range”
When you consider the performance of acoustic panels on the average voice frequency, you can predict the result. The panel will absorb most of the voice energy down to 205Hz, while foam will only absorb frequencies above 500Hz. Here’s the issue: Regular foam panels do nothing to help reduce the build-up of low-frequency noise in the booth—the result: chest thump (excessive bass).
For vocal booths with this problem, an effective solution is acoustic foam bass traps.
The design lets you position the trap up high in the corners of your walls, out of the way. Low-frequency sound naturally gathers in corners as the ceiling and walls combine to act as waveguides. The bass traps will help you control lower frequencies, which you may encounter in a small vocal booth.
Door placement
Small vocal booths are best accessed with a door that swings outward from the booth, like in the sample designs above. This may seem obvious, but others have made the mistake of inward swinging doors, making it hard to get in and out, especially with the gear in the way.
A sliding glass door could be an option, but they require more space, which we don’t have, and also can introduce a larger reflective surface, which we don’t want. Seal around the door sufficiently to stop air.
Window placement
The best thing to do when you’re talking about vocal booths of this small size is to install a door that has a window in it: two birds, one stone.
The window is just a means to see an engineer or producer. Most likely, you’re doing this at home at won’t have either of those people in your studio. So, theoretically, you could do without a window. However, that could feel quite claustrophobic.
If you are working with other people, just be sure the viewing angle is such that the person inside the booth can see the producer’s visual cues.
Lighting
Here’s the deal. Small booths get hot. You’ll want to use a very cool, low energy lighting system. LED’s work well for this. They are cool and quiet. This is important because the heat in this small spce could be a problem. Find out how to cool a vocal booth in 5 different ways.
Although fluorescent lights are cool to the touch, they tend to be noisy, sometimes creating a buzz. Also, the quality of light from fluorescent lights can be depressing.
You’ll want warm lights for a more natural look. When I say “warm,” I don’t mean temperature. I mean color.
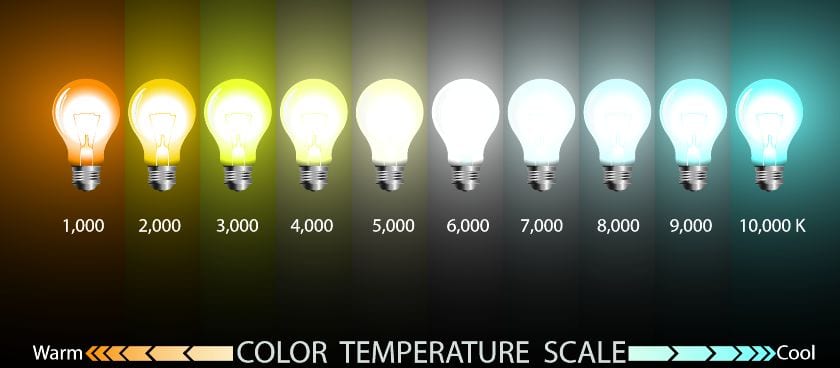
For a natural light and easy reading, you’ll want bulbs in the color range of 2,500 – 5,000.
I use the GE LED Bright Stik 10-watt (60-Watt equivalent) in my booth. They are a perfect warm color temperature of 2,850K. Check the prices on Amazon before you buy them.
Avoid dimmer switches because they frequently generate electromagnetic fields that introduce hum into your voice recording.
Electrical
Remember, as you build your vocal booth to be sure you have easy access to electrical outlets at the correct height to plug in all your shelf-mounted gear, like microphones, laptops, e-readers, etc.
Wall-mounting power strips are an excellent solution, too. Make sure to seal all your outlets to stop air and noise.
Ventilation
I’ve found that one of the most challenging aspects of building a vocal booth is keeping it cool (ventilation). Small rooms get warm very fast, and having fresh air in the booth will keep you comfortable and awake.
You have to introduce airflow somehow. After research, I discovered a simple, quiet way to achieve this.
To introduce airflow, first, build intake and outflow baffles (mazes) where fresh air can enter from the floor level and exit up high near the ceiling using natural convection to help it along.
A few low-speed fans with larger out-flow ports usually perform better than one big fan that must spin at a higher (louder) speed.
Faster Options
If you don’t have time for a DIY project and you just want to buy a vocal booth to get started quickly, here are a few great options.
A full-sized working vocal booth:
The Snap Studio Audio Booth available at Amazon.
A very affordable portable rig:
Foldable Microphone isolation Shield at Amazon
If you want to learn more, read this to find out if microphone isolation shields work.
I hope all this information helped you in some way. Now, I have to get back in the studio. See you next time.

- Review of the ALABS IRON MINI-WL: A Powerhouse Wireless Microphone - October 4, 2023
- What is a Saturator in Music Production: A Brief Explanation - May 11, 2023
- What Are Rotary DJ Mixers? An Overview - May 11, 2023
SoundStudiomagic.com is a participant in the Amazon Services LLC Associates Program, an affiliate advertising program designed to provide a means for sites to earn advertising fees by advertising and linking to Amazon.com. We also participate in other affiliate programs which compensate us for referring traffic.